High-quality images will make your brand look more appealing and improve conversion rates. Humans are primarily visual creatures and are more likely to read content with enticing visuals. Stock images can be expensive. However, some businesses can afford to hire graphic designers. To get high-quality images at affordable prices, try using the free image editor tools in Canva, Illustrator, and Pixlr. This article will help you learn how to use these tools.
Canva
Customizing images with Canva is a breeze. You can use their library of stock images and templates or upload your own. Click the "Upload Panel", and select the image you wish to use. Click and drag the image to the desired size. The image will automatically scale to the size of the frame. Once you've chosen the image, click and drag it to the appropriate location on the canvas.
Canva is available for free, but the pro version offers more features. Canva has a simple interface that is accessible to both beginners and professionals. You can access all of the tools in the premium version, including unlimited downloads from its stock media library. Canva Pro accounts give you unlimited access to all the library and all the tools you need to create any type of design. Canva offers a multi-seat option. This is unlike most stock image agencies that offer this feature. You can add up to five people to your Canva pro account for the same price as an individual subscription.
Pixlr
Pixlr lets you personalize photos with more flair. Pixlr's photo editing software features a simple design tool and a wide range of tools. Pixlr won't alter the original photo, unlike similar software packages. It applies layers to each layer instead, so you don’t have to worry overwriting the original. You can even add text to the image.
Pixlr will also allow you to add text. You will first need to upload the images you want for your infographic. You can then use the editing tools or the collage option to improve the graphics. Choose graphics that are complementary to the information you're creating in an infographic. Then, save your completed project as an.PXZ.
Illustrator
There are many options for customizing images in Illustrator. Depending on the file type and resolution, you can embed images in your document. To do this, first open the image you'd like to embed. After the image is opened, click File > Add. Click Remove lines if the image contains lines. After you've removed lines, you can use shapes to modify the image.
You can also export the image to another format depending on what you prefer. Illustrator comes with built-in export options. These include artboards or assets. These can be very useful for resizing images. You can also create your own files to store the images in the desired format. After you have opened an Illustrator image file, ensure it is linked. Illustrator will update the linked file automatically whenever you save it.
Instagram
If your business has an Instagram account, it may be time to look into customizing images. You have many options to personalize your images with this software. Adobe Express has templates that you can remix or use straight from the software. You can even have your images automatically resized to fit the platform. Uploading videos to Instagram is possible if you know their aspect ratio and resolution. Adobe Express is a great alternative to spending hours creating images for social media.
You can also customize your Instagram photos using the tools provided by the website. The first step in choosing the format. If you are uploading a logo, for example, choose an aspect ratio of 1 and then add padding. PNG images are another option, as they have less artifacting than JPG images and are rich in color. Business accounts should include a logo of the company, which will be displayed with the username.
FAQ
What can I do to improve my photography skills with my phone?
Photography doesn't have to be expensive. Amazing images can be captured with a smartphone.
All you need to do is to be able to use the features of the program and to master some basic techniques.
There are many apps to help you edit and share your photos on both Android and iOS.
Here are five tips to help get you started taking better photos.
-
Set Up Your Camera App. Your camera application should be already installed on your device. You can download the camera app from Google Play and Apple's App store.
-
Use filters and effects. Filters and effects allow you to change the appearance of your photo without having to touch your image.
-
Adjust Exposure. You can control the brightness by changing your exposure.
-
Photograph in the Right Light Shooting in bright light makes it easier to see details in your subject. If you shoot in low light, it is possible to capture shadows or highlights in your photo.
-
Take Pictures Of People. You can share the things that you love most by taking photos of others.
Learn more about taking better photos with your smartphone by reading our article 5 Tips to Improve Your Photography Skills.
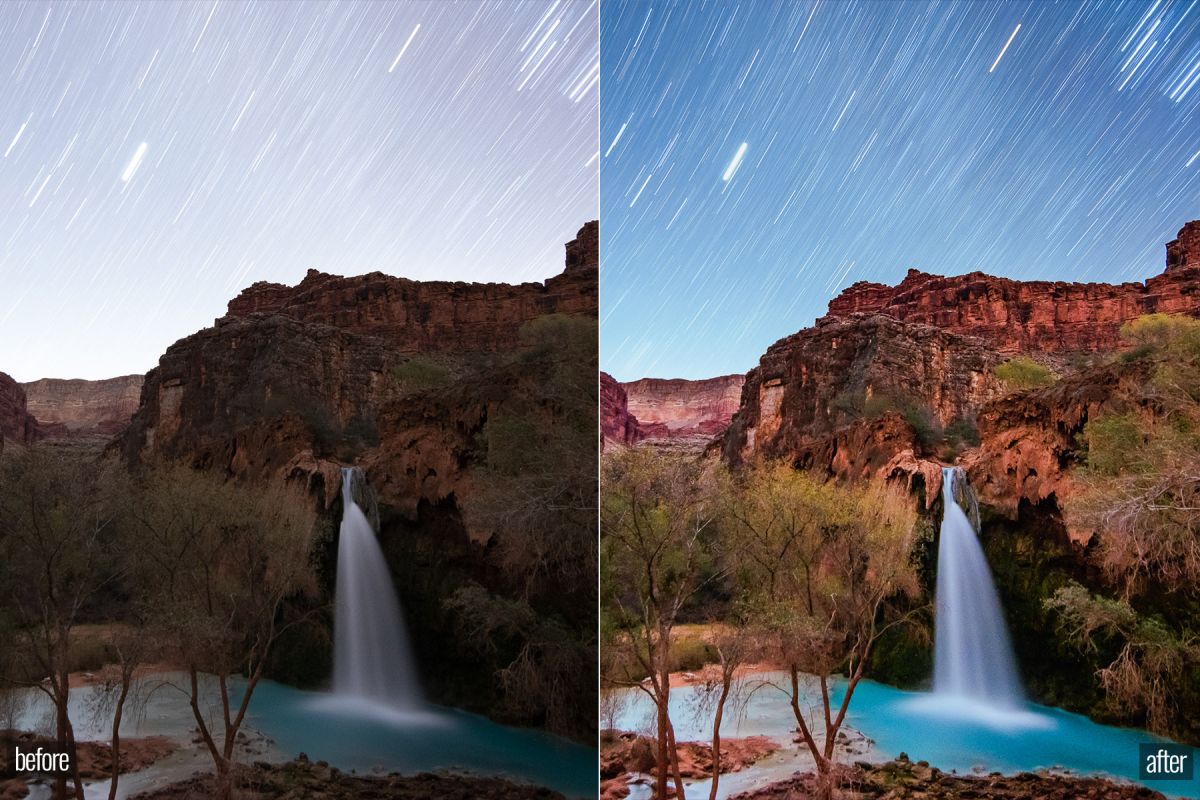
Light Room is a great way to enhance your photos.
To ensure that you get the best photos for your project, it is best to start early. It's always better to take as many shots as possible and then pick the ones that will give you the most bang for your buck.
Lightroom allows this because it lets you see the effects of different settings on each photo. You can also adjust these settings on-the-fly without going back into Photoshop. This allows you to quickly test what looks great and what does not.
How can I learn photography on my own?
There are many ways you can learn to take great pictures. You have the option to buy a book and attend classes, join an on-line community, or watch YouTube tutorials. If you really want to learn how to take pictures, it's best to do it yourself. That way, you have complete control over what goes into each photo. As long as you continue learning, you will always be improving.
In fact, one of the best things about digital photography is that you don't even need expensive equipment. All you need is a computer with internet access and a camera. The rest is up for you.
Here are some ways to get started.
-
Acquaint yourself with the manual settings of your camera.
-
Learn how to use the basic controls.
-
Take lots of photos.
-
Make sure to edit them.
-
Share them.
-
Keep practicing.
-
Experiment.
-
You can try different perspectives and angles.
-
Use light sources creatively.
-
Practice makes perfect.
-
Be willing to fail.
-
Be patient.
-
Have fun!
Is photography a job that is rewarding?
Photography is an artistic form that allows one to capture and share moments in time. It can also make you a lot of cash if your are willing to do the work. There are many opportunities to make a career as a professional photographer. You can start by taking photos as a hobby for family and friends. This will improve your skills and increase confidence. After you've mastered this stage you can move onto paid assignments. The best photographers are able to make a living out of their work. They may take clients to events such as weddings and parties, where they must capture images of people enjoying themselves. Most professionals prefer to photograph commercial projects, such as product shots and advertisements.
Finding the type of photography that you love is key to being a successful photographer. Continue to practice, experiment and learn new techniques until your skills are perfected. There is no substitute for experience, so don't expect to succeed overnight.
You should first develop your technical skills before you focus on creativity as a beginner. Photography encompasses both technical and artistic aspects. Photography is a complex art that requires both artistic and technical skills. Understanding the basics of composition can help you achieve your goals faster.
It is important to consider whether you are interested in a full-time career or if you would like to work part-time. Many people combine their passion for photography and other jobs. You might be able to work for a local newspaper while also pursuing freelance projects. Others choose to dedicate their entire time to photography. It doesn't matter what way you go, success in any creative field requires dedication and commitment.
It is important to take the time and effort necessary to make a career out of photography. So, think carefully about whether you really want to devote yourself to something like this.
How do I get started with digital photography?
If you are just starting to get into digital photography, the most important thing is to choose which camera you would like. There are many options: DSLRs (digital Single Lens Reflex Cameras), point-and–shoot compact cameras or camcorders. Each one has its advantages and disadvantages. DSLR cameras, however, are larger and heavier than most other types of cameras. Point-and-shoot cameras are smaller and lighter and often include automatic settings for certain situations. Camcorders provide excellent video recording capabilities and may also feature still photo shooting modes. Smartphones are light and portable and can be carried around easily.
Once you've made a decision about the type and model of camera you want, then you must decide whether you want to buy it new or used. If the camera was purchased in the past few years, it is possible to find used cameras at reasonable prices. Newer models usually cost more as manufacturers invest large amounts of money to develop new technology.
Next, you'll need to buy lenses. Lenses play a key role in determining the quality of your photographs. They enable you to adjust the focal length of the lens so that you can zoom into the scene with no loss of focus. Some lenses are equipped with flash units built in, while others require external flash units. There are many brands offering a variety of lenses. Each brand has their own distinctive characteristics.
Finally, memory cards are something you should consider. Memory cards can store pictures that were taken with your digital camera. Your card's size will determine how many pictures it can store. You will need multiple memory card if you plan on taking many photos.
What makes a good camera backpack?
Because it protects your equipment while you are traveling, choosing a camera backpack is crucial. These are the things to consider when shopping for a bag.
-
Sizing: A large bag will hold your camera and other accessories. Do not buy more than you need.
-
Durability: Look for bags made of durable materials such as leather, canvas, nylon, or polyester. Avoid using plastic bags or fabric bags.
-
Protection: Make sure that your bag offers protection against dirt, moisture, and scratches
-
Organization: Sort your gear by type in order to make it easy to access the items you need. For example, put your lenses in one compartment, your memory cards in another, and your battery charger in yet another.
-
Comfort: Avoid carrying around a bulky bag when you are shooting. Instead, carry a shoulder belt. Comfortable designs with padded shoulders are also recommended.
-
Price: You can shop around to find a great price. Many brands offer their products at discounted prices. This can be a huge advantage.
-
Warranty: Make sure to ask if they offer a warranty for their products. This will ensure that you are able to contact the right person if something happens to your bag.
What Camera Should You Get?
That all depends on what kind of photographer you want to become. For beginners, a simple point-and-shoot is the best camera.
However, once the basics are mastered, it's likely that you will want more advanced features. The decision is yours.
These are some considerations before you purchase a camera.
-
Features: What features are you looking for? Are you going to use autofocus, manual settings, or both? What number of megapixels does the camera have? Is there a lookfinder?
-
Price: How much will you spend? Are you planning to upgrade your camera every year or two?
-
Brand: What brand will you be satisfied with? You don't have to settle for anything less than the best.
-
Functionality: Can your camera operate in low light conditions well? Can you take high resolution photos?
-
Image Quality - How clear and sharp is your image quality?
-
Battery Life: How long can your camera last before it needs to be charged?
-
Accessories: Are you able to attach additional lenses or flashes? ?
Statistics
- In this case, 100% of readers who voted found the article helpful, earning it our reader-approved status. (wikihow.com)
- That's the easiest way to get blurry photos 100% of the time. (photographylife.com)
- Get 40% off Adobe Creative Cloud(opens in new tab) (creativebloq.com)
- The second easiest way to get blurry photos 100% of the time is to use a cheap filter on the front of your lens. (photographylife.com)
External Links
How To
How to take macro shots in photography
Macro photography can be defined as the ability of taking pictures at close range of small objects, such insects or flowers. Macro means large in Greek. It is possible to capture images of very close objects if you have a lens with a focal range greater than 50mm.
A good macro lens must have a long work distance and a fast aperture so that sharp images can be captured without having to move around. It is important to avoid motion while taking photos. Anything that moves during exposure may blur your image.
Here are some tips to take great macro photos:
-
Use a tripod. A tripod is a must if you don’t already have one. This will reduce the chance that you move when trying to take photos.
-
Select the right lighting. Many macro lenses have built-in light filters. If you don't already own one, get one. It helps to avoid overexposure.
-
Be patient! Shooting macros takes practice. Sometimes you may only see a tiny bug or flower, but it's worth it to keep shooting until you catch it.
-
RAW is the best format for shooting. RAW files store more data than standard JPEGs. RAW files are better for editing later as you can make adjustments such as cropping and colour correction.
-
Remember to include the background. The background can be as important as the foreground. It's worth including it in your photograph.
-
Keep learning.